

TABLE OF CONTENTS
4.1. Event Entry
4.2. Customize and embed the Registration form
4.3. Enable Ticketing and Coupons
5. People
5.1. Attendee
5.2. Speakers
5.3. Exhibitors
5.4. Hosts
5.6. Attendee Interests
6. Sessions Tab
6.1. Session List
6.3. Pre-recorded Videos
6.4. Session Settings
7.1. Lounge
7.2. Booths
7.3. Resources
7.4. Event Space Settings
8.2. Landing Page
8.3. Reception
8.5. Add Sponsors
9.1. Customize email communications
11. Workflows
12. Analytics Tab
12.1. View Audience level data
12.2. View Performance level data
12.3. Send a detailed Analytics report
13.1. Enter and preview the event
13.2. Open event for Attendees
1. Overview
We understand that you want to create a simple event and customize it according to your event needs. It is condensed down to include some of the most important and most-used aspects of your event!
This means that you will be able to build your event quickly and easily using the Events Dashboard. This article gives you a quick summary and breaks down each segment of the dashboard and the details that you would need to know to navigate through.
2. Create an Event
Step 1: Click on "Create Event" and select the type of "Virtual Event" template or create from scratch by clicking on "Create from scratch."
Step 2: Enter the following event details, you can also use AI assistance for some.

a) Event Name: Enter an event name that would be showcased on the landing page.
b) Start & End date & time: Enter the event start & end date and time to be showcased on the landing page.
c) Event entry rule: Select the event entry rule you want your attendees to enter the event.
d) Event Description: Write an overview of the event for your attendees to read. You can also add a different text background & font color along with hyperlinks & images.
e) Organization Name: Enter the organizer name to be shown on the landing page.
f) Organizer email: Enter the organizer's email address for attendees to reach out in case of any queries.
Step 3: If the event is created from scratch, then select the Virtual Event format and then click on the "Create Event" button to create a new event.

3. Summary Tab
Once the event is created, the first tab you enter is the summary tab. You can add session speakers, sponsors, and booths directly from this tab as an event organizer.
Airmeet provides you with particular suggestions to set up for event registration, pre-event, and post-event.

3.1. View Landing Page
As an event organizer, you can preview the "Landing page" and check how it will look after entering all the details.
3.2. Edit Event details
If you want to edit the essential event detail missed in the "2. Create an event" section, you can edit the same and update the desired information.
Kindly click on the "Edit" button near Event details on the right side, enter the details, and click on Update.
4.1. Event Entry: You can choose who can enter the event and how attendees register for your event.
To change the event entry, click on the Registration tab > Event Entry tab > click Edit > select any of the event entry rules.
You can also enable Pre-Event entry for the attendees to explore and get familiarized with the platform before the main event starts. Enabling the post-event entry will allow the event organizers to set up the session replay for the attendees who couldn't attend the event on time.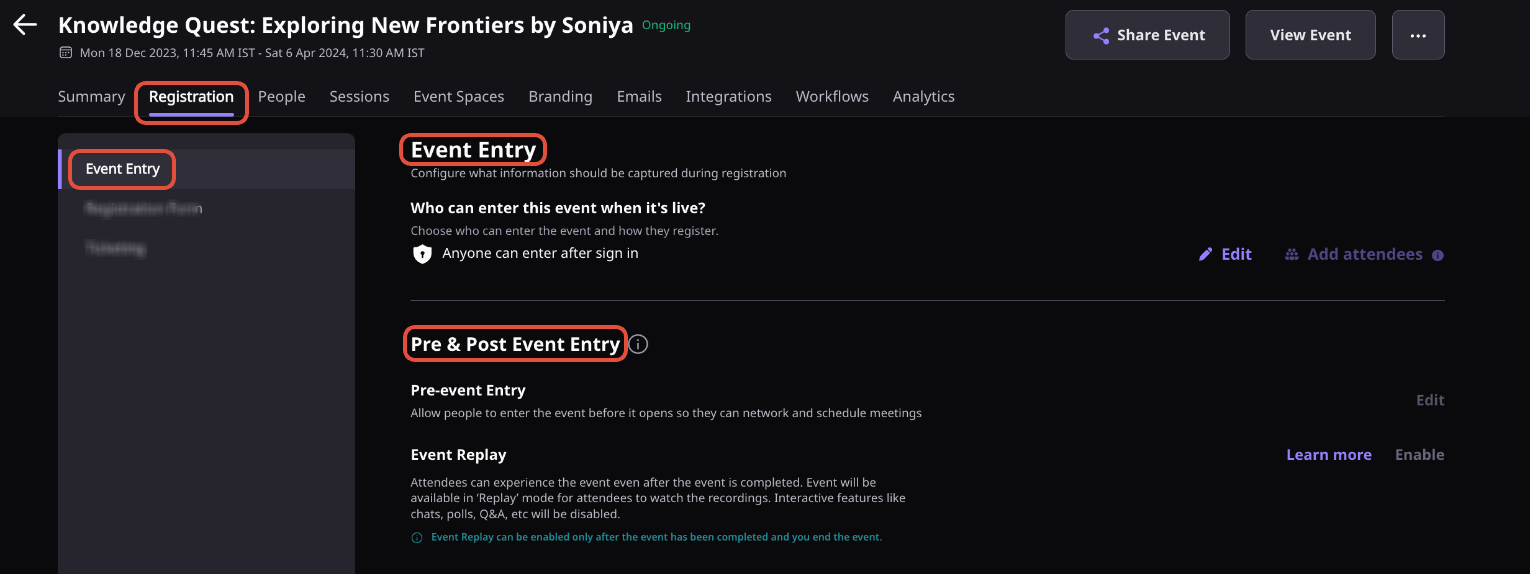
4.2. Customize and embed the Registration form: Whenever attendees join an event, they need to fill in the attendee form. As an event organizer, you can customize the registration form and embed the same on your micro-website.
To edit the registration form, click on the Registration tab > Registration form > click the "Change" button and make changes according to your preferences.
To embed the form, click on the "Embed Form" button and customize it according to your requirement, and copy the iframe code that can be embedded on your micro-site.

4.3. Enable & Add Ticketing & Coupons: Enable ticketing for your event by clicking on the Registration tab > Ticketing > click on the "+Add Ticket" button. You can create up to 20 types of ticketing based on different prices and monetize your event.
To enable ticketing for your event, you need to connect with your Stripe account, post that, add tickets, and make them live. You would also be able to add Coupons for each ticket tier.
5. People Tab
5.1. View & download the Participant's list: Manage and view the participant's list, download the participant's list from the "Download list" button, and add attendees via CSV upload.
As an event organizer, you can also Copy and send a reminder email with speakers, exhibitors, and attendees' unique links.
5.2. Speakers: In this section, you can find the list of speakers or even add new speakers. You can also re-edit or update the speaker details, map them to sessions, and find the speaker's invitation links.
5.3. Exhibitors: You can find the list of added exhibitors or download them. You can also find the exhibitor's invitation link.

5.4. Hosts: Here, you will find the list of event hosts and their details such as assigned sessions. You can also hide the host from the participants and event information by clicking on the eye icon.

5.6. Attendee Interests: You can edit the attendee interests that is shown on the profile from this section but it has to be edited before starting the event.

6. Sessions Tab
The session tab includes all sections related to your session and the agenda planned for the event. You can add different sessions based on activity and group them into tracks. It allows the organizer to Add speakers and map them to other sessions, upload pre-recorded videos, and fetch session recording post-session is completed.
6.1. Sessions List: As an event organizer, you can add different activity-based sessions to prepare your agenda accordingly. You can add the following types of activities:
- Session
- Session as a video call
- Pre-recorded video Session
- Stream into Airmeet
- 1-1 Speed networking
- Fluid space
- Break
- Booth

6.2. Session Recordings: Session recordings are enabled by default. All recordings will be available a few hours after a session ends. You may switch off recordings for individual sessions before starting a session in the LIVE event.

6.3. Pre-recorded videos: Upload and run pre-recorded video during your live session on stage. To upload a pre-recorded video, click on the "Upload a video" button and select a video from your computer. You can also choose a video from the community-level shared video library.
Pre-recorded video specifications
- Format supported: Mp4 format
- File size: Upto 5 GB

6.4. Session Settings: Under the session settings tab, you can find various session settings as given below:
6.4.1 Live Stream: Stream sessions out using third-party streaming software. Enable universal key to key single Stream Key for the non-parallel session and paste it on your third-party broadcasting software.
Live stream your live session to Facebook & Youtube, along with third-party platforms via RTMP.
Add or select the account and map it to your live sessions. Click on "Add Stream destination" and either select from a previously connected stream destination or add a new one by clicking on the "+Add new" button.

6.4.2. Stream into Airmeet: Stream sessions out using third-party streaming software. Enable universal key to key single Stream Key for the non-parallel session and paste it on your third-party broadcasting software.

6.4.3. Streaming Resolution: Allows you to enable full HD resolution (1080p) for the session video and recording quality.

6.4.4. Advanced Settings: Under the advanced settings, you can enable or disable various event settings such as Hide/show your session's live chat, Q&A, polls, people in session, attendee count, emoji reactions, or clear live chat, Q&A and polls.

7. Event Spaces
7.1. Lounge: Go to this section to either enable or disable the social lounge. You can also click on the "Preview Lounge" button to preview and edit the tables if required.

7.2. Booths: You can add the booths and the booth exhibitors from this section. You can also find the exhibitor's invitation link, and update or delete the booths.

7.3. Resources: You can add event resources such as images, videos, pdf, links, and such in this section. You can use these resources inside your event. The added resources can be edited, downloaded, and deleted.

7.4. Event Space Settings: The event space settings contain two parts:
- Leaderboard: The leaderboard is the gamification feature inside the event to encourage the attendees to participate actively in the event activities. In this section, you can have the following settings:
- You can enable/disable the leaderboard or add leaderboard winner's prizes by using the toggle button.
- You can re-allocate the leaderboard points, set the number of leaderboard winners, and restrict the attendees to the leaderboard by clicking on "Edit".

- Advance Settings: You can click on the External Link Hypertexticon to find the event settings that allow the event organizers to enable/disable features such as "Hide/show event attendees and chat", "renaming top navigations", etc.

8. Branding Tab
Enhance your event experience by adding branding to the event. Airmeet provides various options to add branding at different event sections.
8.1. Event Branding: You can use your logo and welcome video as one of the branding elements for your event in Airmeet.

8.2. Landing Page: Customize your landing page in 2 different layouts and add Carousel Media, CTA & text font colors along with multiple options to select from the background, event stats, & many more items to be shown.

8.3. Reception: You have access to two types of reception:
- Default Reception: You can add a static branding banner for the default reception.
- Custom Reception: You can upload a customized reception banner and further add videos, links, and iFrame Plugins.

8.4. Upload Stage Backdrop: You can use beautiful or branded stage backdrops to make your stage pop up. The stage backdrops can be uploaded from this section by clicking on "Upload backdrop", and there is no cap on how many you want to add. You can also update or delete the uploaded backdrops using the "Pencil" icon and "X" respectively.
Kindly follow the Stage Backdrop Guidelines to create the stage backdrop.
8.5. Add Sponsors: If you have event partners or sponsors, you can flaunt them up in the event information. To add sponsors go to Branding > Sponsors > click on the Add Sponsors button. The sponsor tiers can also be added and under which you can add sponsors as required.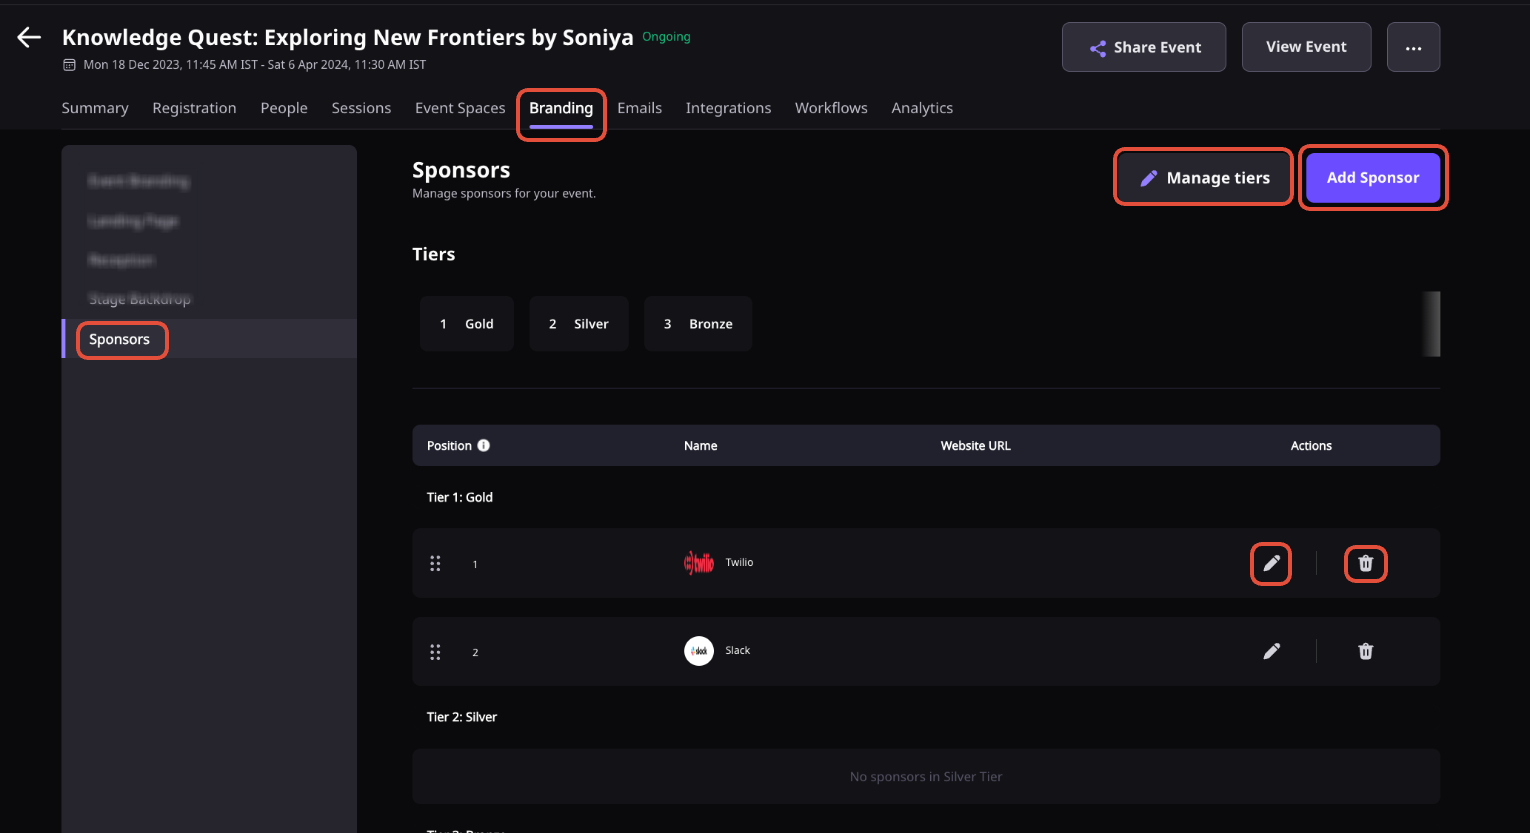
9. Emails Tab
9.1. Customize email communications: Configure & customize the emails sent to participants at different stages of the event. As an organizer, you can customize the default template, which includes the following section:
- On Registration
- On Session Bookmark
- On Invitation
- Event Reminder Emails
- On Ticket Purchase
- On Ticket Request
- Reminder Emails (For Event Ticket Holders)
- Upon clicking on "Send Confirmation Email" from the participant tab

You can also create a new email and send it to different stakeholders of the event (Speakers, Attendees, Exhibitors)
10. Integrations
Enable event-level integration from the wide range of Native integrations. Once you connect the platform integration from the community dashboard, you will be able to enable the integration at the event level and start exporting/important participant data.

11. Workflows
Workflows allows you to get an automated message on slack or email for certain activities that the event attendees perform during the event as per your workflow setup.
12. Analytics Tab
Airmeet 360° Analytics comes equipped with multiple dashboards and a segment builder. The dashboards are built to provide granular insights, such as topics that piqued attendee interest, in addition to the specific mode(s) of engagement preferred by audiences, the ROI generated for sponsors, and more.

12.1. View Audience level data
The segment builder will allow organizers to build audiences based on various engagement parameters and later use them to run targeted marketing campaigns and send personalized post-event communications.
12.2. View Performance level data
Analytics of virtual events is important to understand the stance of your business and organization in the virtual world. The report can also be used for promoting your services & products and generating sales. Airmeet provides high-quality, detailed analytics of the events hosted on our platform.
12.3. Send a detailed Analytics report
Send a detailed report to your email address and analyze the complete data. The event analytics report will be available on the dashboard for the organizer to view 10 minutes after the event starts.
Reports are available on the event dashboard for an overview and insight, and the detailed report can be sent to community team members from the dashboard.


Event Dashboard > Analytics Tab > click on "Send Full Report"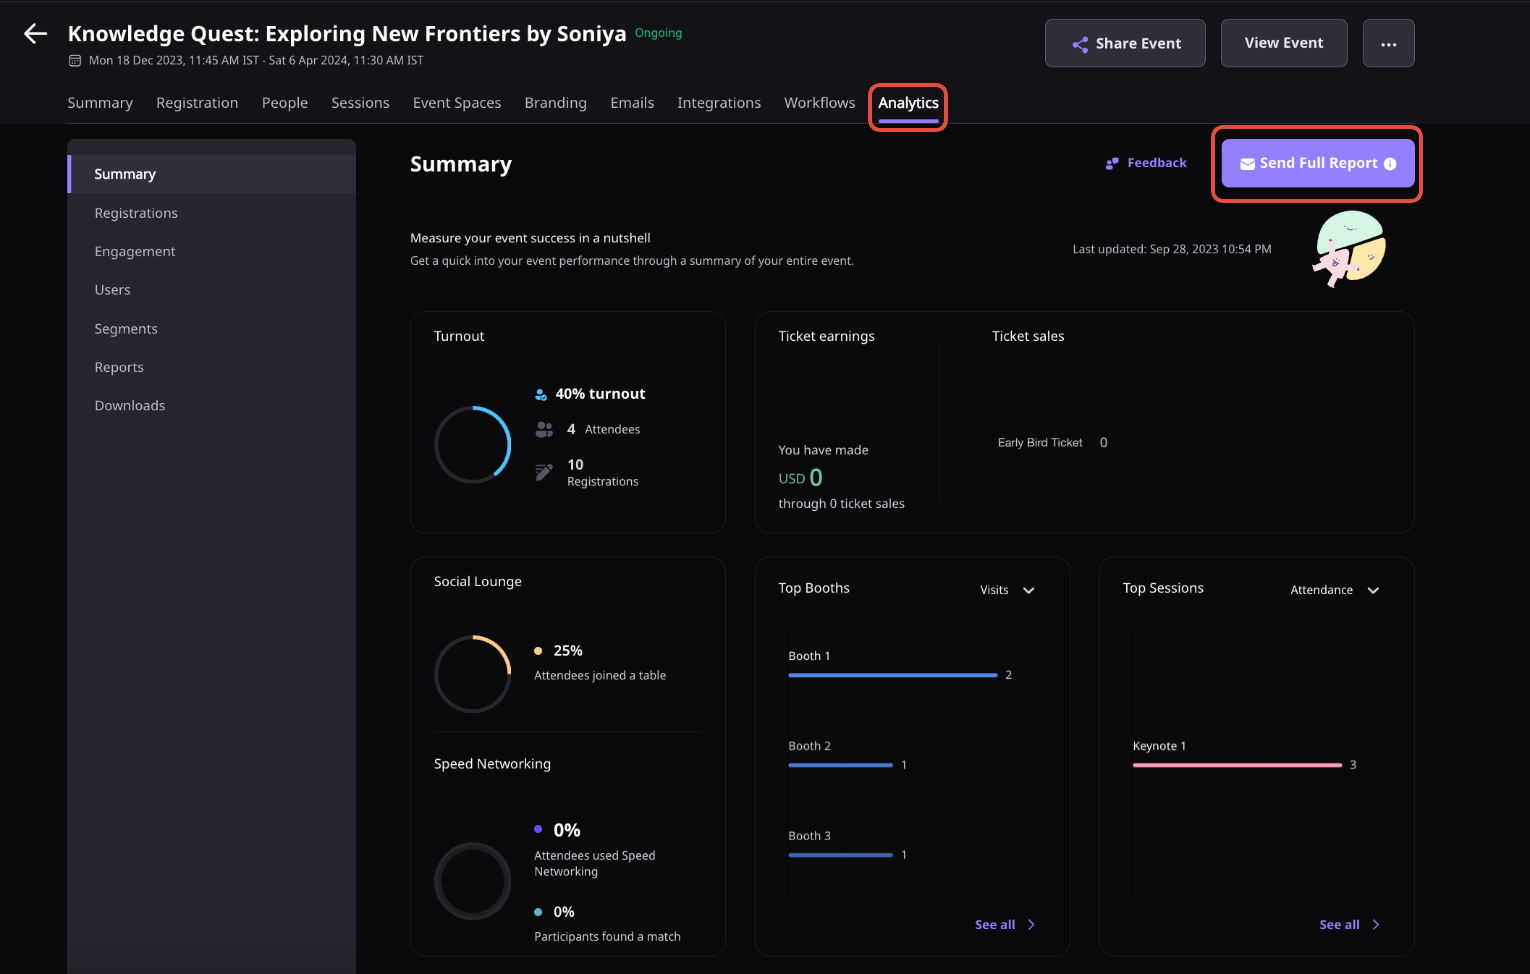
13.1. Enter and preview the event
Click on "View Event" and Preview the event and set up your lounge & booths according to your preferences. Perform dry runs with your speakers and set up the Lounge and Booth according to your event theme.

13.2. Open event for Attendees
Open the event and let your attendees enter the event and let them start interacting among themselves.
From the event dashboard, click on "Start event".

13.3. Pause event
Pause your event temporarily and disable early access for your attendees. The pausing event will display "Paused" on the landing page and will restrict attendees from entering the event till the time you start the event.
Click on the "3 dots" and click on the "Pause event".

Note: Attendees at the event will not be thrown out until they refresh the browser or exit the event.
13.4. End event
Close the event to permanently restrict event entry access for attendees. Closing event will display "Ended" on the landing page and will restrict attendees from entering the event.

Note: Attendees at the event will not be thrown out until they refresh the browser or exit the event.
Also, once the event is marked closed, it cannot be restarted again.
14. Support & Assistance
Have some queries? Contact us at support@airmeet.com or visit our Customer Support Lounge.
Was this article helpful?
That’s Great!
Thank you for your feedback
Sorry! We couldn't be helpful
Thank you for your feedback
Feedback sent
We appreciate your effort and will try to fix the article