

TABLE OF CONTENTS
2. How many pre-recorded videos can we upload? What should be the size of the video?
3. Who can all play pre-recorded videos?
4. How to upload and play the pre-recorded videos during the live session?
5. Play the pre-recorded videos during the live session
1. Overview
Go Live without being Live! Just pre-record your video and play it at your Airmeet event. This feature will surely level up your online event and drive more engagement saving your own time and dismissing the availability of a few key speakers and content.
2. How many pre-recorded videos can we upload? What should be the size of the video?
The event organizer can upload as many pre-recorded videos as you need for your event.
- The maximum size of each video is 5 GB.
- Supported format .MP4 (h264 codec)
- Resolution videos are played at - 720p
Disclaimer: Airmeet compresses the uploaded video quality by the organizer/host on the dashboard.
Tip : For compressing your video (incase file limit is greater than 2GB) you can use a handbrake tool to compress, kindly refer to below link:
Handbrake Pre-recorded Video Compressing - Instructions
3. Who can all play pre-recorded videos?
The session host and co-host can play pre-recorded content during the session.
Note: The user interface may appear different in Virtual Events Format/Webinar format.
4. How to upload and play the pre-recorded videos during the live session?
Video can be uploaded in 2 ways for your event.
a) Community level
Upload your video to the community dashboard to save it in your personalized video library, which can be accessed while setting up your event from the event dashboard.
Community dashboard > Library > Videos > Upload your video
b) Event Level
While setting up your event from the dashboard, go to the Videos tab and either upload your video or select the video uploaded and saved in your video library (Community level).
Event dashboard > Sessions tab > Pre-recorded Videos > Upload your video or Add it from the Video library.
5. Play the pre-recorded videos during the live session
To play the video on the backstage/live stage:
- Go backstage in your Airmeet session.
- Find the Manage tab (vertical layout) on the right-hand side of the stage. Click on the Videos tab.
- Select the video you want to play and hit that play button on the screen.

Disclaimer : There might be a delay of 20-30s in playing the video when on backstage.
Kindly wait for a few seconds and avoid clicking on the video again and again.
6. Player Controls
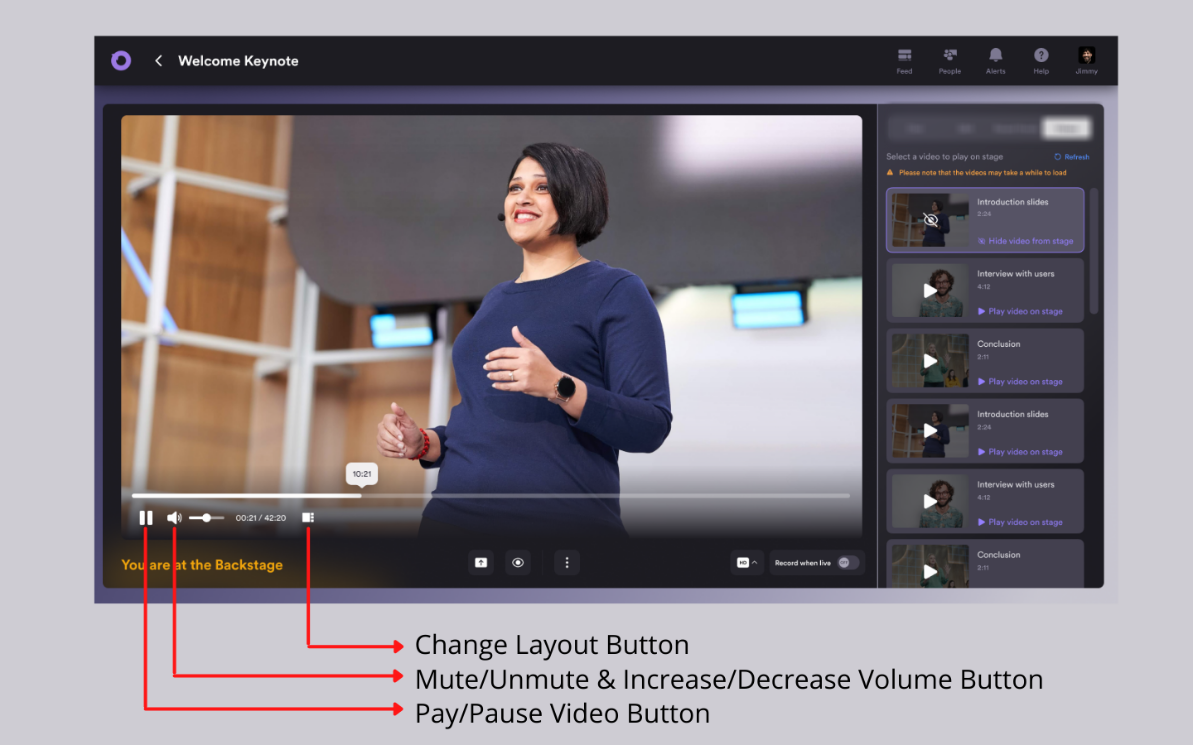
- Play/Pause Button - As soon as the video is selected, click on the play button and the same for pausing the video.
- Video Volume Control Button - Configure the "Volume Control" line to increase/decrease or mute/unmute the video volume.
- Change Layout Button - You can also hide/unhide the host and the speakers from the top right of the screen by clicking on the "Change Layout" button.
- Remove Video: To remove a video from the stage, you can click on the Hide button (Slashed Eye) from the video section on the right side of the page.

Need more help? Contact support@airmeet.com or visit our Customer Support Lounge.
Was this article helpful?
That’s Great!
Thank you for your feedback
Sorry! We couldn't be helpful
Thank you for your feedback
Feedback sent
We appreciate your effort and will try to fix the article