

TABLE OF CONTENTS
4. Send Unique links to invites or confirm registrants
6. Download the Participant list & View Failed Uploads
6.1. Download the participant's list
1. Overview
Event entry in Airmeet implies how an event organizer wants their participants to enter & access the event effortlessly.
Event entry rule that supports uploading the list of attendees:
- Enter via sign-in
- Only invited people can enter
- Ticketing (Upload details for your selected participants)
People on the participant list can enter the event using their unique links.
An event organizer can use this option to restrict event access to specific people. The event organizer needs to upload a list of authorized attendees.
Only the attendees (imported email IDs) specified on this list are allowed to enter the event, and other people who have your event link but are not included in the CSV will not be able to join the event. They will get a message saying that the event is private.
2. Walkthrough video
Set up 'Enter via unique link' Event Entry
Set up 'Only invited people can enter' Event Entry
Steps to follow:
Event dashboard > Registrations tab > Event Access tab > Click on "edit” > Select "Enter via sign-in" under "Register with email verification", OR “Only invited people can enter”.
3. Upload invite list
After selecting the “Only people who are invited can enter” option, follow the steps below:
Step 1: Click on the “View attendees” & Click on the "Add attendees" option, or go to the People tab > Attendees section & Click on the “Add attendees” option.

Step 2: Download the list template and use the format specified in the CSV file.
Read about: How to set up a custom CSV template and add attendees?
Note: Attendees' first & last names and email addresses are mandatory to be added to the CSV list.
While using a CSV file, please do not change the header content of the same.
Step 3: Upload the CSV file once you have entered the information of the desired attendees.
If an event organizer wants to add a new batch of participants to your event, you can use the same original CSV file. Add a new list of participants and re-upload it. The old list will be counted as redundant and ignored while new people are added to the participant's list.

Step 4: Preview the CSV content and click "Next."
Note: The event organizer can not remove the attendee(s) once the file is uploaded. Only new records with unique emails in the file will be added to the list. Other records will be ignored.
4. Send Unique links to invites or confirm registrants
Once you have previewed the CSV data, you will have two options:

4.1. Register attendee
Select "Register attendee", if the attendee's registration is confirmed, and send them the confirmation email. Your registration limit will be consumed as soon as the unique event access links are generated for the uploaded list of registrants.
4.2. Invite attendee
Select "Invite attendee", if you want to send them the invitation first and let them confirm the registration once the attendees click on their unique link. Your registration limit will be consumed only when the participant(s) confirm their registration by clicking on the unique link.
5. Send an invite via email
After uploading the list & select the invite type, the event organizer will have two ways to invite their participants:
5.1. Kindly follow the steps below to send a unique link (magic link) :
Step 1: Once the list of attendees has been uploaded & invite type is selected,
For "Register attendee" invite type, checkmark “Send registration confirmation email with unique access link”.
For "Invite attendee" invite type, checkmark “Send invitation email with unique access link” and click "Next".
Step 2: Click "Next." A confirmation message will be sent, which will immediately trigger an email to all the attendees with their unique links to access your event.

Read about: How to customize & send email notifications to event participants?
6. Download the Participant list & View Failed Uploads
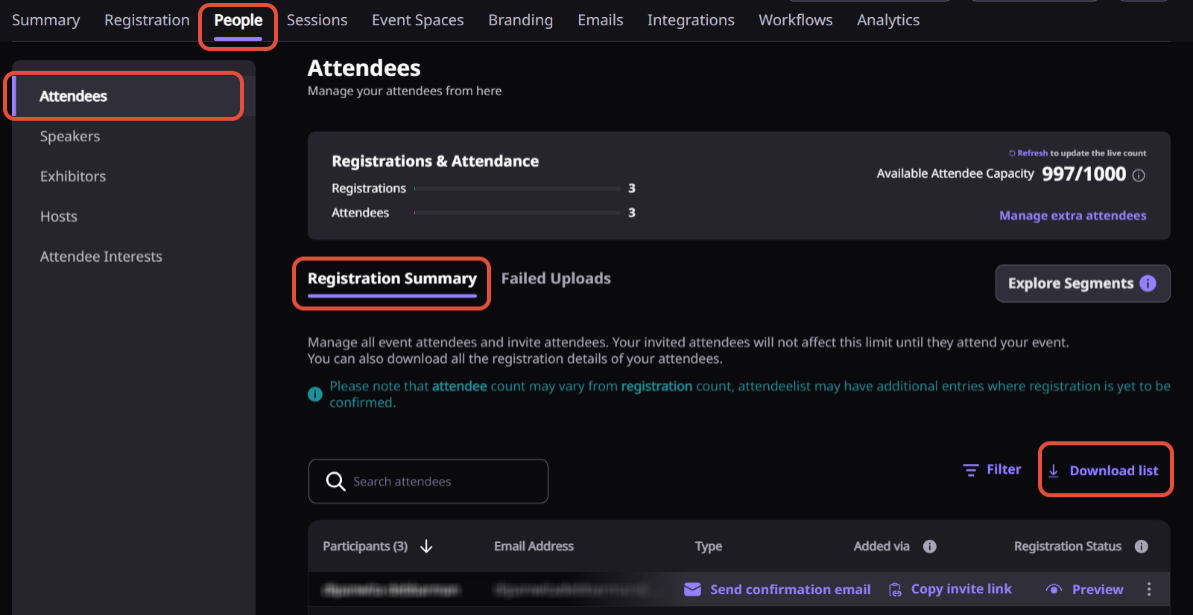
6.1. Download the participant's list
An event organizer can view the list of all registered and invited attendees for their event from the dashboard under the “Attendees” section.
The event organizer can export the registration details of the participants. The exported file also contains the unique event access link of the participants that the organizer has added.
The organizer can send those unique links to participants on their behalf or if participants have not received the email due to any technical glitch.
6.2. Failed Uploads
If there has been any discrepancy in the data that has invalid data, those participants' details would be shown under the "Failed Uploads" tab.

7. Edit/Block participants
Organizers can edit any attendee details from the participant list at any time. Email addresses cannot be edited.
Events dashboard > People tab > Attendees > Registration Summary > Hover over the respective participants, then click on the "3 dots" and select "Edit."
Organizers can block unwanted attendees from the participant list at any time. Blocked attendees cannot enter the event using their unique access links or login until they are unblocked.
People tab > Attendees > Registration Summary > Hover over the respective participants, then click on the "3 dots" and select "Block."

Attendees in the live event who get blocked will be removed from the event immediately.
Need more help? Contact support@airmeet.com or visit our Customer Support Lounge.
Was this article helpful?
That’s Great!
Thank you for your feedback
Sorry! We couldn't be helpful
Thank you for your feedback
Feedback sent
We appreciate your effort and will try to fix the article