

Note: Hybrid capabilities are an Add-On for Virtual Events plans.
TABLE OF CONTENTS
4. Online Reception Banner & Custom Reception
6. Event Partners/Sponsor Logo
7. Social lounge & Booth Table's logo
Note: Branding for Hybrid event format is similar to Virtual event format, apart from the terminology of the branding section.
1. Event Branding overview
2. Event Landing page Banner
- Recommended dimensions: 1440px X 810px.
- Supported formats: JPEG, SVG, PNG.
- Maximum file size: 5 MB.
Step 1: Event's Dashboard > Branding tab > Landing Page and click on Preview and Customize to customize the landing page and upload the banner image.

3. Event Logo
- Recommended dimensions - 84px *84px.
- Supported formats - JPG, SVG, PNG.
- Maximum file size 2 MB.
To add a Branding logo and sponsor image for your event, follow the image dimensions below:
Step 1: Event's Dashboard > Branding tab > Event Branding tab > Upload Event logo

4. Online Reception Banner & Custom Reception
Brand your event by adding your event logo and adding an opening banner on the reception page for attendees to see. Reception is the first thing attendees see once they enter the Airmeet event
Currently, Airmeet has two different layouts that the organizer can use to enhance the participant's experience:
1. Default Reception layout: Displays the venue banner along with session details and event partners on a single page.
2. Customize Reception layout: A fully customized single image having the option to embed a video and transparent clickable links to redirect your participants to other parts of the event.
Step 1: Event's Dashboard > Branding tab > Online Reception Tab > Select Default reception & Upload the Reception banner.
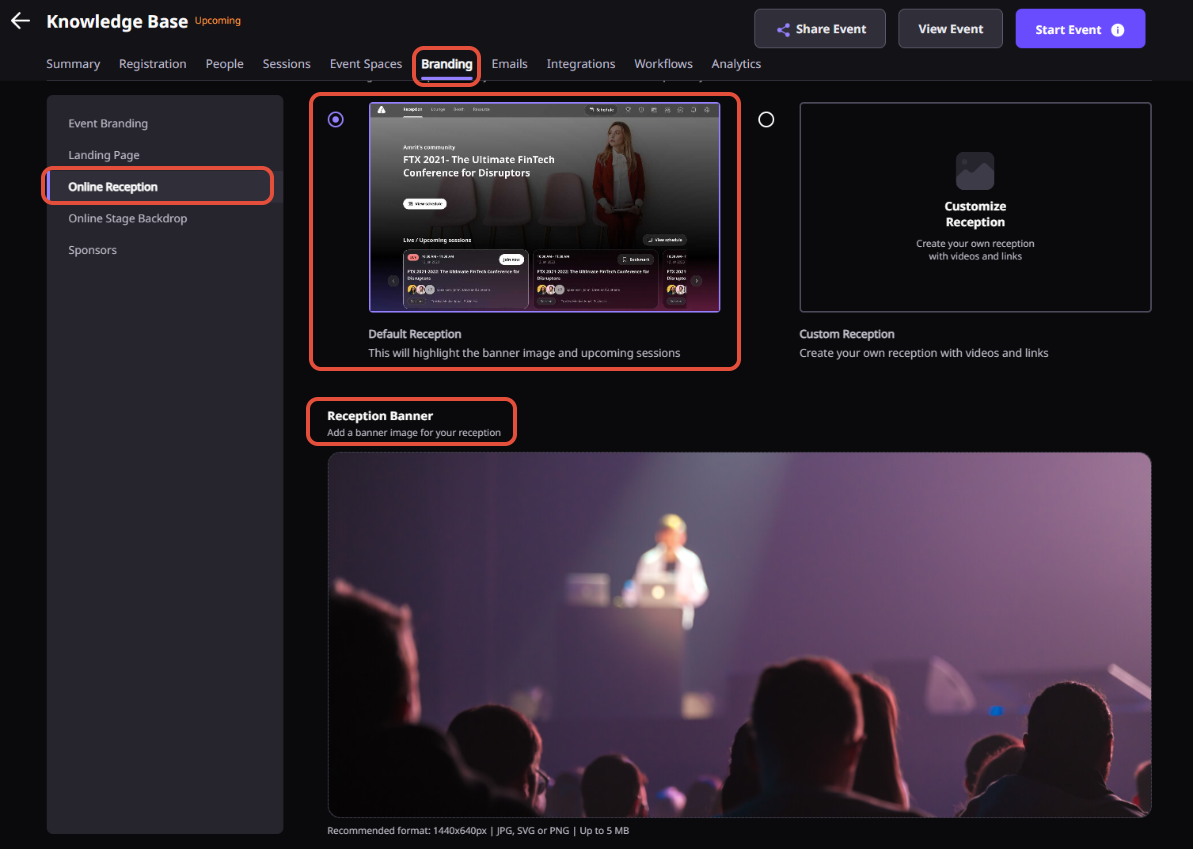
Default Reception banner
Select the default reception layout and upload the venue banner accordingly.
- Recommended dimensions: 1440px*640px
- Supported formats: JPEG, SVG, PNG
- Maximum file size is up to 5 MB.
Create your own reception with videos and links.
Upload a background image along with videos of up to 5 & multiple hyperlinks to set up your own custom background.
Step 1: Event's Dashboard > Branding tab > Reception Tab > Select "Custom Reception" & click on "Edit custom reception" to start creating your own custom reception.

Background Image
- Recommended dimensions: 1440px *720px
- Supported formats: JPEG, PNG, SVG
- Maximum file size up to 10 MB.
Videos
- Video Format : .MP4, .AVI
- File size: Up to 1000MB
Related more: How to set up “Customized Reception” in an Airmeet event?
5. Online Stage Backdrop
The stage backdrop is a static banner image that can be displayed on the live session stage. It is displayed when a session is in progress and is visible to all attendees. An organizer can add as many Stage Backdrops as they want for the event.
Stage Backdrop Specifications:
Create backdrops according to the specified design guidelines:
Optimize your backdrop design for the right dimensions: 1536px wide and 1040px tall, you can put all your branding logos at the top area of the backdrop, like sponsors' logos, branding elements, etc., as per your convenience.
If your uploaded image is smaller than these dimensions, Airmeet will stretch it to cover the stage, making it look blurry.
Dimensions: 1536px X 1040px
Maximum file size: 10 MB
Format: JPEG, JPG, PNG
Steps: Event's Dashboard > Branding tab > Stage backdrop tab > Upload Stage Backdrop
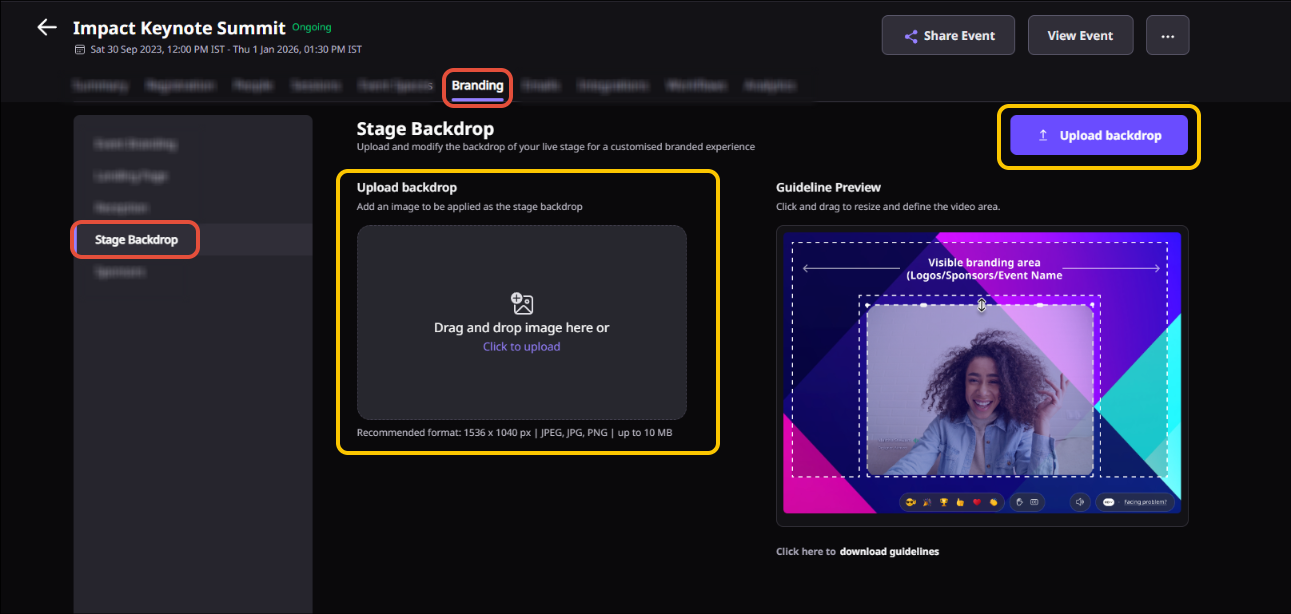
Adjust Stage backdrop & Preview
Step 1: Once the stage backdrop is uploaded, preview the backdrop and adjust the video grid according to your logo's and covered area.

Step 2: Preview the backdrop image to see how it will look during the event. If the preview looks good, click on "Save".
6. Event Partners/Sponsor Logo
Add & Display your sponsor on the event's landing page & on the default reception.
Sponsor Logo Specifications:
- Recommended dimensions:400px*200px
- Supported formats: JPEG, SVG, PNG
- Maximum file size: 1 MB.
Suggestion: We recommend the sponsor logo with a transparent background if possible to give the logo more visibility.
Also, Gold Sponsors, the preferred size of the logo, can be extended to 1000px*200px. Supported formats: JPEG, PNG, and SVG.
Note: Event partners/sponsors won't be visible if Custom reception has been applied, but they will be shown on the event's landing page.
Steps: Event's Dashboard > Branding >Sponsors tab > Add Sponsor & map them according to different Tiers.

The sponsor/ event partner will be shown at the bottom of the reception page & on the event landing page.

Note : *The above event partner's logo is used for display purposes only.
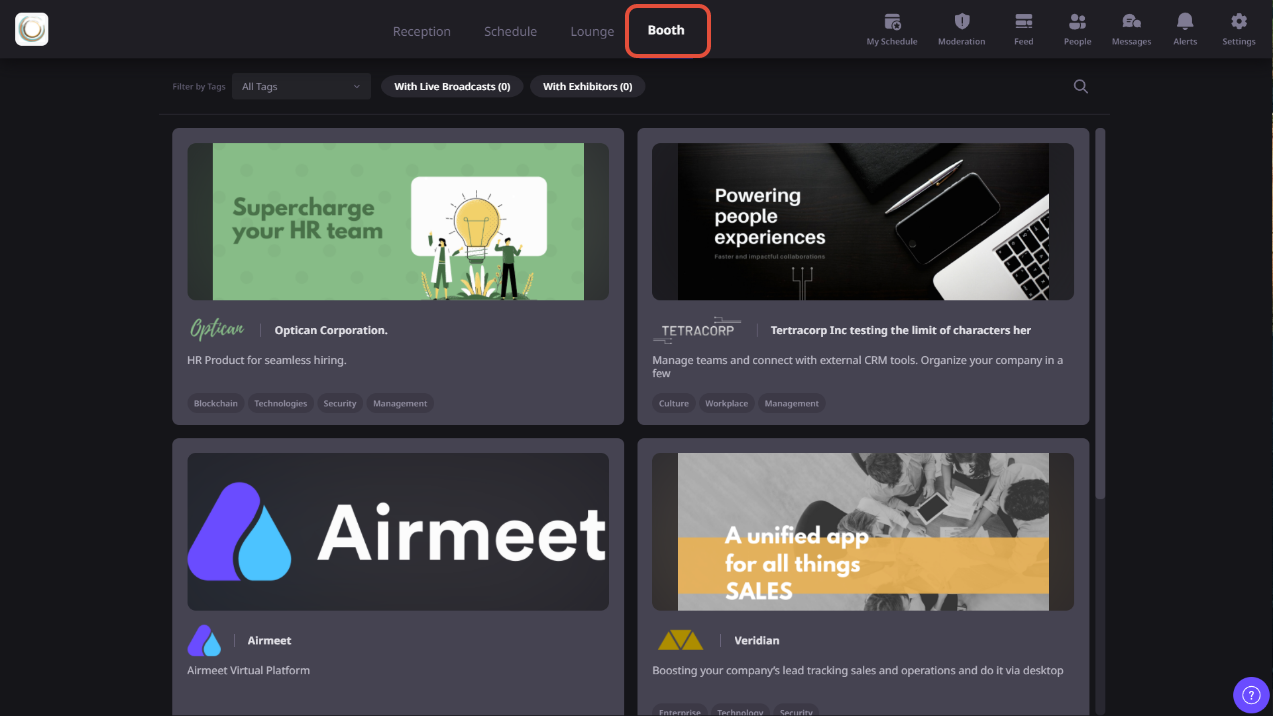
7. Social lounge & Booth Table's logo
To add a logo and table name, follow the below steps.
Steps: Go to your event, hover on any table, and click on the 3 dots. Click on the edit option and upload the table logo & table name.

- Supported formats: SVG, PNG, or JPEG
- Maximum file size: 500 KB.
- Recommended dimensions: 144px*56px or 720px*280px (depending on the scale)

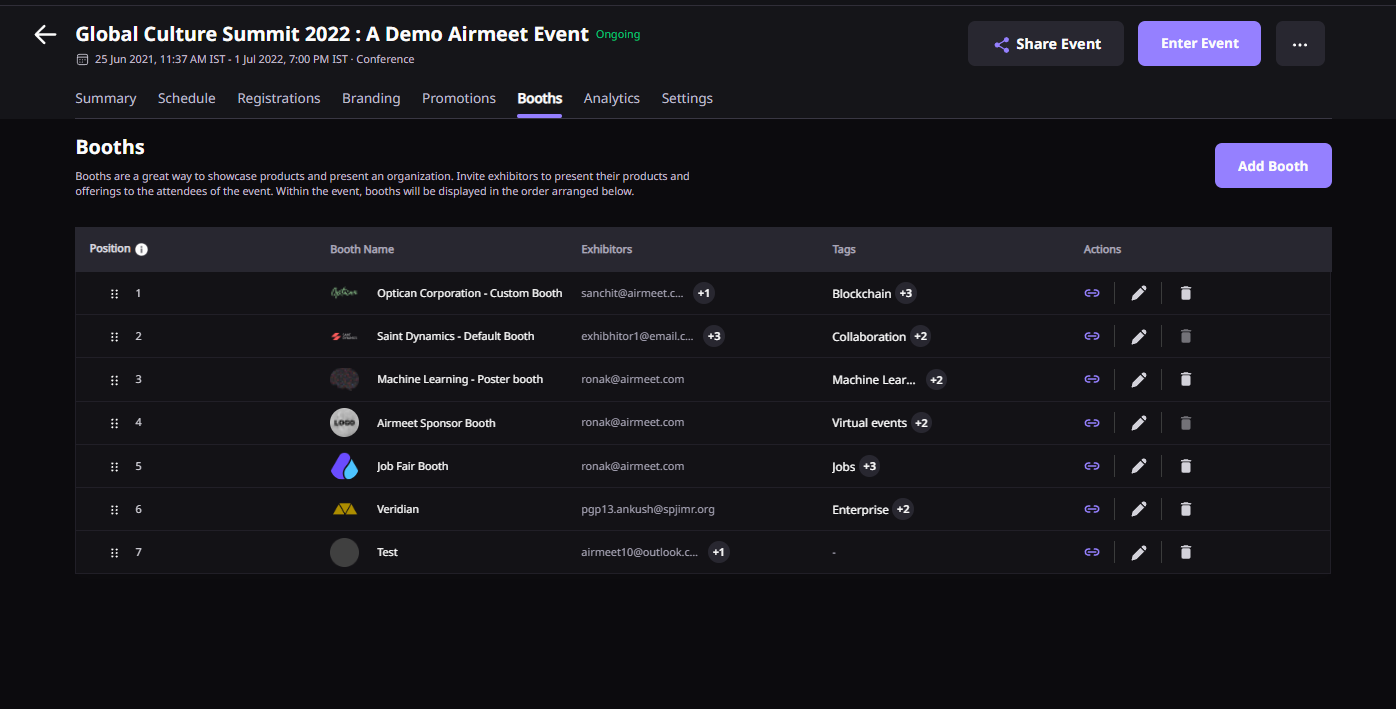
8. Booth Logo & Banner
Booth Logo Specifications
- Recommended dimensions: 960px*480px
- Supported formats: JPG, SVG, PNG
- Maximum file size: 5MB.
To add a booth logo, follow the below steps.
Steps: Event Dashboard > Event Spaces tab > Booths Tab > Add Booth > Upload Booth Logo
Booth Banner
Booth Banner can be uploaded within the booth while editing & setting it up.
Steps: Enter Event (Preview mode or Live Event) > Visit particular Booth, > click on 'Edit Booth Info' > Select layout > Upload Booth Banner Image.
Default Booth
Booth Logo Specifications:
- Recommended dimensions: 960px*480px
- Supported formats: SVG, PNG
- Maximum file size: 5 MB.
Tip: Best fit booth logo size : 400px*244px
Booth Banner/Card Specifications:
- Recommended banner dimensions: 1200px*400px
- Supported formats: JPG, SVG, PNG
- Maximum file size is up to 2 MB.
- Recommended banner dimensions: 1200px*400px
- Recommended background image dimensions (Custom background image): 1176px *504px.
- Supported formats: JPEG, PNG, SVG
- Maximum file size up to 10 MB.
Read More: Set up a “Custom Booth” in an Airmeet event
Booth External View
Default Booth Internal View

Custom Booth Internal View

Need more help? Contact support@airmeet.com or visit our Customer Support Lounge.
Was this article helpful?
That’s Great!
Thank you for your feedback
Sorry! We couldn't be helpful
Thank you for your feedback
Feedback sent
We appreciate your effort and will try to fix the article