

TABLE OF CONTENTS
- 1. Overview
- 2. How to create a session Call-to-Action (CTA)
- 4. Participants' View
- 5. Things to keep in mind
1. Overview
Create a call to action to share offers and instructions to engage and convert your audience.
Showcase Call to Action (CTAs) with a title, description, image, and link on the stage to the live session attendees at the right point during an event to capture high-intent leads.

2. How to create a session Call-to-Action (CTA)
Step 1: Go to Backstage/Stage and click on the right-hand side "Manage" icon.

Step 2: Click on the "Call to Action" icon and click "+Create Call to Action".

Step 3: Choose the Banner type to be shown to participants.

- Toast: Show a side toast message from the right-hand side to give a glimpse during the session.
- Full screen: Show a full-screen CTA on center stage to all participants with the offers during the session.
Step 4: Click on "Continue" and enter the CTA card details:

1. Add a Background Image: Add a background image to catch the audience's eyes with some catchy illustrations. You can choose from default images or can also upload your images as well.
Recommended Dimensions: 960 x 320 px
Format: JPG, SVG, PNG
Size: Maximum up to 5 MB
2. Enter a message for all participants: Enter a message for your participants to read about the offer.
3. Customize the background & button color: Customize the background color of the CTA box and CTA button.
4. Enter Button Text: Enter the button text that will be shown to all participants.
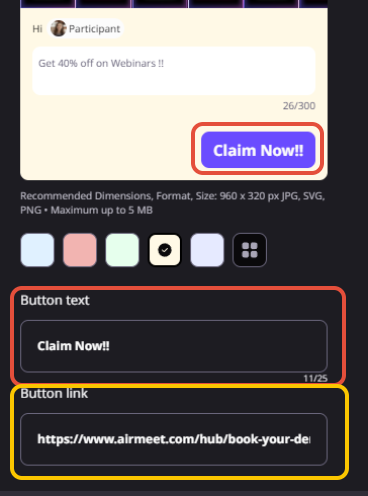 5. Enter Button Link: Enter the URL that will be redirected to all participants after clicking on the CTA.
2.1. Automate CTA on Live Stage (New)
The Automate CTA feature allows organizers to schedule or trigger Call-To-Action (CTA) messages automatically during a live session. Whether you want to promote a link, drive engagement, or share an important announcement, this feature ensures your CTA appears at the right time—without manual effort.
Example Use Cases
- Trigger a “Download Resource” CTA automatically after the presentation ends.
- Display a “Book a Demo” button during your live product demo to capture leads instantly.
Step a: Choose When the CTA Should Appear
You can select from three options based on your preferred trigger method:
- Manually
Publish the CTA anytime during the session by clicking Publish.
Ideal for when you want complete control over timing. - After Session Starts In
Schedule the CTA to appear automatically after a specific number of minutes once the session goes live.
Example: Set it to appear 5 minutes after the session begins to highlight an offer or survey. - After Specific Minutes
Choose a specific time (e.g., 12 minutes into the session) for the CTA to be triggered automatically.
Great for pre-planned promotions or mid-session engagement.

Step b: Monitor Scheduled CTAs
Once scheduled, organizers can see a countdown timer indicating how much time is left before the CTA appears. This helps in tracking and ensuring timely delivery during the live session.

Step 5: Click on the "Preview" button to view the CTA before publishing. After previewing it, click on the "Save" button.
2.2. How to publish session Call-to-Action (CTA) manually
Step 1: Once the CTA banner is created (as shown in Point 2), you can showcase the banner on the stage anytime.
Step 2: Click on the "Show on Stage" button and display the banner on stage.
 Note: You can edit or delete the banner by clicking on the 3 dots for each banner.

4. Participants' View
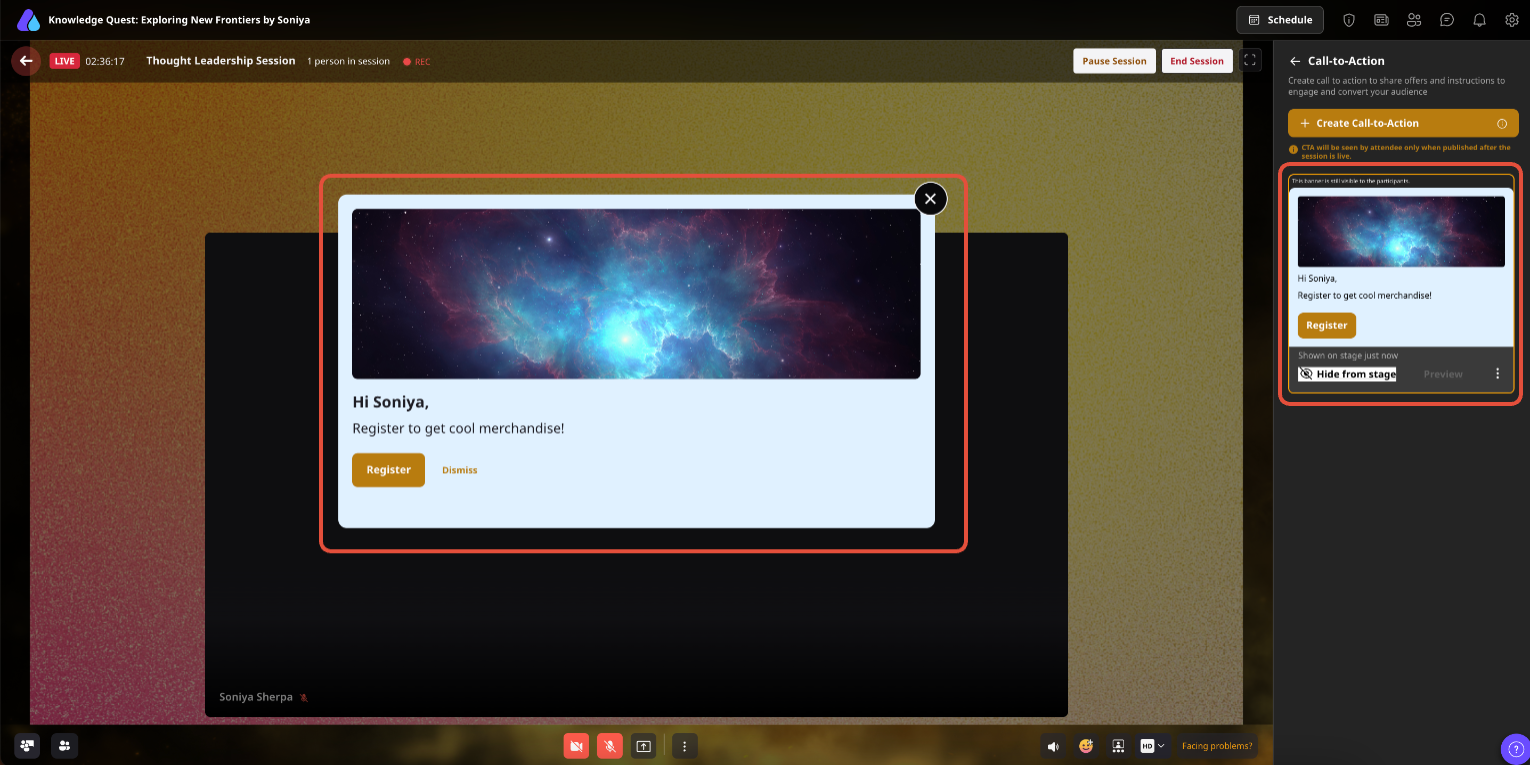
Full-screen banner

Toast banner
5. Things to keep in mind
- The session banner (CTA) is created for a particular session and cannot be copied to another session.
- Session CTA is displayed to all session participants, whether they are a speaker, exhibitors, attendees, or an organizer.
- Session CTA can only be published/shown to participants when the session is live.
- Session CTAs will not be visible in the session recordings.
Need more help? Contact support@airmeet.com or visit our Customer Support Lounge.
Was this article helpful?
That’s Great!
Thank you for your feedback
Sorry! We couldn't be helpful
Thank you for your feedback
Feedback sent
We appreciate your effort and will try to fix the article