Airmeet community should be in Appsumo, Premium Webinar, Virtual Events or All In Suite plan
Need to have a Zapier account on paid plan to run more than (50 task) zaps.
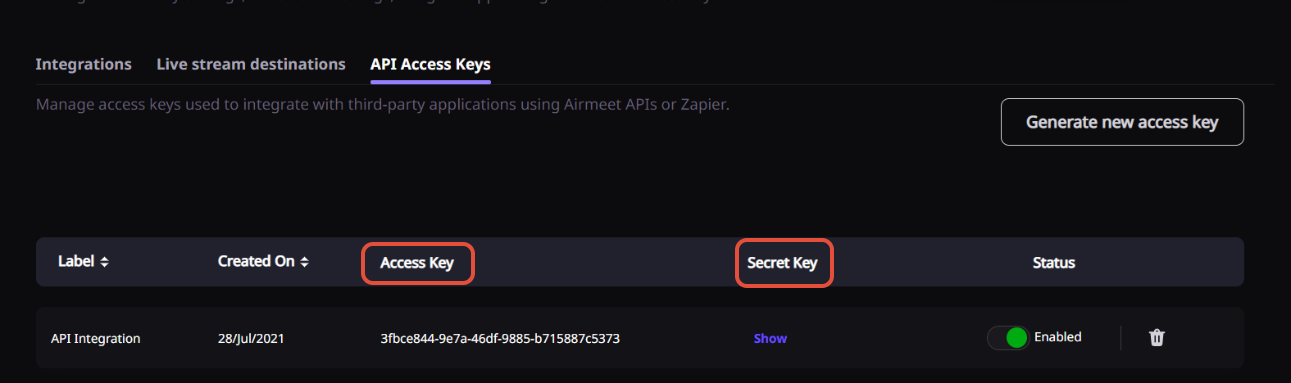
Airmeet Access Key
Airmeet Secret Key
2. Use cases
To integrate 3rd part tools for Certificates (Accredible App will be in use)
Bulk upload speaker data via G-sheets
We can Integrate https://www.quicket.co.za/ via Zapier into Airmeet for a seamless registration flow <Google sheet to Airmeet registration with custom questions>
Integrate paystack via Zapier.
3. Overview
Zapier is for users who want to update the Google sheet attendee list in Airmeet or integrate with Email marketing services such as MailChimp, Paypal, etc.
Once the Zapier account is co-joined with the Airmeet account, all the data in the selected tool will be synced automatically in Airmeet.
Step 2: Enter the triggers & actions for your workflow.
Step 3: Choose an app to integrate (applications you want to Integrate) Google Sheets, PayPal, Accredible Certificates, ActiveCampaign,Customer.io, Drip, etc
Step 4: Select Airmeet on the other side.
For Example: If you want to connect Airmeet to another tool, kindly select Airmeet under "Connect with this app," and if you're going to connect another tool with Airmeet, then select Airmeet under "with this one".."
Sync Other Tool with Airmeet
Sync Airmeet with another tool
Step 5: Customize the information you want with Airmeet (basically means when to allow Zapier to create the automated lists. For example, e.g., Create an attendee list as they register, the remainder before the events, etc.
Step 6: Select the Trigger & Action for the application and create a Zap.
4.1. Airmeet Triggers
A trigger is an event that starts a Zap. Once you've set up a Zap, Zapier will monitor for that trigger event. E.g., you can set up a Zap to send a direct message in Slack to yourself every time participants register for an event.
4.2. Airmeet Actions
An action is an event a Zap performs after it is triggered. For example, if you want to add a participant as soon as he is added to your Mailchimp audience, the action is ‘Add Registrant.’
Step 6: After selecting triggers & actions (with another application), click on "Try It" to start connecting both the accounts and initialize the data sync.
Step 7:Zaiper works in 3 steps
a) Connect your accounts to Zapier: Connect your accounts to Zapier
b) Set up your Zap: Choose which data to send to Airmeet (Google sheet to Airmeet)
c) Turn on your Zap: Start automating your work
Step 8: Connect your application by providing the relevant information & authentication.
Step 9: Connect the Airmeet account by entering the Airmeet Access token & key.
Step 9:Select the Airmeet event you want to sync the data.
Step 10: After connecting both the accounts, customize the fields and map them together.
4.4. Turn your workflow (Zap) on
Step 11: Once done, Test the zaiper by sending test data to verify if the Zap is working fine.
Step 12: Post verification, Turn on the Zap to start the workflow.
Now all the data entered will be transferred to the Airmeet application (in the case of Google sheet to Airmeet )
For better visualization, please watch this tutorial video:
5. FAQs
1. What kind of authentication does Airmeet use? Airmeet uses API keys.
2. Do I need a paid Airmeet account to use Airmeet with Zapier? You need a paid Airmeet plan to use Airmeet with Zapier. https://www.airmeet.com/hub/pricing/
3. Do I need special account permissions in Airmeet to use Airmeet with Zapier? There aren't any specific Airmeet account permissions to connect Airmeet to Zapier.
4. Are there any API token limits in Airmeet when I use Airmeet with Zapier? No, there are no token limits when using Airmeet with Zapier.
5. Are there any webhook subscription limits in Airmeet when I use Airmeet with Zapier? Airmeet doesn't have any webhook subscription limits when you use Airmeet with Zapier.
6. Are custom fields in Airmeet supported when I use Airmeet with Zapier? Yes, Airmeet supports custom fields.
7. Does Airmeet use real trigger samples from my Airmeet account? No, Airmeet does not provide real trigger samples from your Airmeet account. Only generic samples are provided.
8. What kind of Airmeet hosted account can I use with Zapier? Airmeet's Zapier integration supports cloud-hosted accounts only.
9. How much time does it take to transfer the data to and from Airmeet and other integrated platforms? Zaiper might take a minimum of 30 sec to a maximum of 15mins to transfer the data depending upon the data size and filter added while executing the data transfer. It is recommended to check Zap history and Zap tasks to get the exact status of the data transfer.
6. Limitations
In the free account of Zapier, it might take time to transfer data from one platform to another